Showing posts with label visual arts. Show all posts

Saturday, July 28, 2012

Art in a Cafe

Orange Thimble - Art Cafe

Orange Timble is an art cafe located at Tiong Bahru. Tiong Bahru is a place, in Singapore, reserved to promote arts and culture. The Orange Thimble is one example of how they create a space for creativity from passion and espressos. It is a cafe run by the people who grew up in Tiong Bahru, who supports the creative community.

Right now, The Orange Thimble is exhibiting the unique perspective of Tiong Bahru by Colin Chow. I've been to the cafe and it really brings forth each unique theme in different segments of the cafe. I'm also impressed on the way they present their food, and how they combine art and food.
It is located at Eng Hoon Street, Tiong Bahru, Singapore. There are many other eateries in that area, so go and check them out!:) 
You can visit the Orange Thimble websit at:
Come, follow us on Twitter at:
and like our Facebook page at:
Thank you!:)

Airbrush Tattoo Body & Face Painting

 Hello Everyone!!!
Do you know about Body Art?
Here's some pictures and a video of airbrush tattoo body and face painting!

    credit :sg.88db.com

 
credit :airbrushingaround.tumblr.com

Here is the Video of the Airbrush Tattoo Body & Face Painting (Mask) . Enjoy ! :D

 
http://www.youtube.com/watch?v=DQGmZdjhrz0

Do share with us a picture of your body art!

Friday, July 27, 2012

Salvador Dali and Surrealism

Surrealism

Salvador Dali (1904-1989) was an artist well known for his surrealism.
These are some paintings done by Salvador Dali. I thought his pieces are rather interesting from the surrealism involved in it.
"The Persistence of Memory" has a mountain at the background from Dali's hometown. it can be also found in his other pieces due to his love or his hometown. The foreground shows several soft clocks that appears to be melted. This is an example of surrealism to show the irrelevance of time.


"The Three Sphinxes of Bikini" was inspired by the experimental explosions on the atoll of Bikini and also the bombs that dropped on Hiroshima and Nagasaki. The two human heads and a tree become a hallucinatory illusion of the mushroom cloud created by the nuclear explosion.
This "sleep" was painted for Dali's patron, Edward James, a British millionaire. The disembodied head lies in slumber against the plain blue sky and an empty space. The face also appears soft, vulnerable and distorted. the features of the face are all supported by crutches to suggest that if they were t be removed, the face will disintegrate.

Salvador Dali was my artist reference for my O Level Art examinations, i am greatly inspired by the way he uses surrealism to bring forth messages. To find more information on the types of art,
you can follow us n Twitter at:
and like our Facebook page at:
Thank you:)

Paintings of Sandro Botticelli

Hey! Here are more paintings! This time, it's Sandro Botticelli!
Here are some paintings by him:


Sandro Botticelli was an Italian painter of the Early Renaissance. He belonged to the Florentine school under the patronage of Lorenzo de' Medici, a movement that Giorgio Vasari would characterize less than a hundred years later as a "golden age", a thought, suitably enough. Botticelli's posthumous reputation suffered until the late 19th century; since then his work has been seen to represent the linear grace of Early Renaissance painting. Among his best known works are The Birth of Venus and Primavera.

Melted Crayon Art

Hi everybody, today i am going to show you how to make melted Crayon Art.

Step1
Lay your supplies down: a canvas (your choice of size), crayons (your choice depending on the size of the canvas), a hot glue gun, and a hair/blow dryer. You probably want to lay an old t-shirt or blanket under the canvas.

Step 2
Sort the crayons out. You should do this depending on what you want. Many people want a rainbow, so they do it in order of the rainbow. Some people do lightest to darkest.

http://pad2.whstatic.com/images/thumb/b/bc/Crayola-study.jpg/177px-Crayola-study.jpg


Step 3
Hot glue each crayon in order on the top of your canvas. Some people keep the wrappers on and some take them off, it's all up to you!

Step 4
Slant the canvas so that the wax will drip (a common idea is to lean it against a wall).

Step 5
Use your blow dryer and blow the crayons. You usually want to point the blow dryer downwards so that the wax will drip. Take note that this will get messy. However, it doesn't really matter how messy it gets as long as your newspapers are laid out correctly.

Step 6 
When done, sit it out and let it dry!


You are done in just 6 step. :)

credit:http://www.wikihow.com/Make-Melted-Crayon-Art

Hand Art

Hello everybody! Today i am going to share with you a video on hand Art. :D

Thursday, July 26, 2012

Masaccio's Paintings

Hey everyone! Let me introduce some of the famous paintings.

Credits: http://hum120.files.wordpress.com/2011/04/2342-004-3c13b075.jpg

Credits: http://www.vanedwards.co.uk/historypics/masaccio.jpg

Credits: http://www.canvaz.com/m/Masaccio/Plate%20of%20Nativity%20(Berlin%20Tondo).jpg

These are some of Masaccio's Paintings. Masaccio, born in 1401, died in 1428. Perhaps one of the most influential artists of the Renaissance. Historians claim that he, along with Donatello and Brunelleschi, inspired the style of art that typifies are of the period. In his 27 years on the planet, he developed a style that used perspective in a way that created an illusion of three-dimensions--a significant change from the flat style of painting that typified medieval art. His most famous work can be found in the Brancacci Chapel in Santa Maria del Carmine in Florence.

Photoshop Tutorial for Beginners and Website Banner Designing!


Hi guys!

For those of you who are interested to do computer graphics and designing through the use of Adobe Photoshop, here's some tutorials to help get you started with it!

These videos will help you understand what each tool does and even teach you how to create your own website banner! This is especially beneficial for people who wants to create their own website in the future!

Have fun!


Paintings

Painting

Hi~ Here are some of the pieces i painted during my free time after my O Levels:))
Here's a little note to keep in mind when you paint:
Never use Black to outline or shade! only if it is really dark! Depends on the intensity of light in the picture. Cause Black is a strong color, use Brown instead. mix the original color with Brown to get a darker shade:)

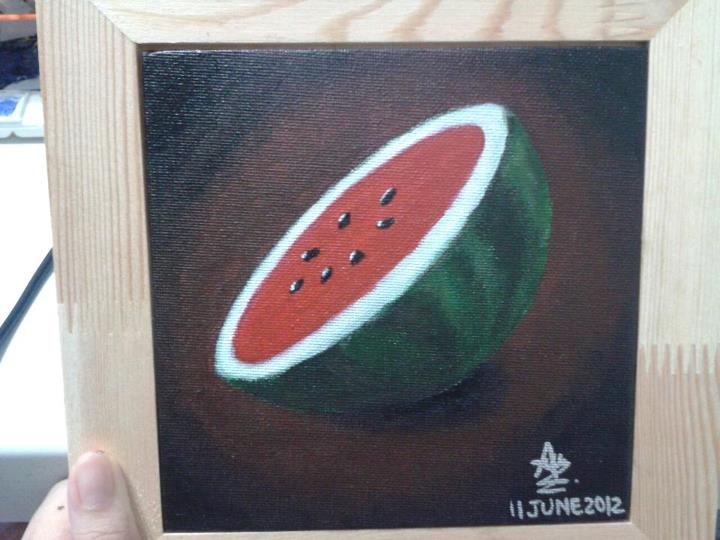
This is my first attempt on watermelons:) it's a little plain haha just trying it out:)
This is my second piece. i decided to give it more "still life' feel with a country theme.
This is my third watermelon. just sitting on a bed of leaves hahha
  And this is the latest watermelon I've painted during the holidays:)
So i decided to try out other themes i could paint on and here's my first attempt on sunset! just trying to play around with the colors, i'm sure there's space for improvements.. it's a combination of all the pictures I've searched online hahaha:) 


I just started painting last year, and my first attempt was my O Level canvas so i learnt a lot from my friends on the spot:) Painting is all about trying out new colors and learning how to mix them well. It is not tough, but i'm still learning:) by the way, if you're searching for a place where you can get your art materials, i've attached an address of Art Friend at buona vista MRT: 100 N Buona Vista Rd, Singapore 139345. It's the easiest to find compared to other branches:)
So, have fun!:)
Follow us on Twitter at:
https://twitter.com/ArtXenses
And like our Facebook page at:
http://www.facebook.com/ArtXenses
THANK YOU!:)


image: http://somethingboutrenes.com/2011/06/23/art-friend-at-buona-vista/
View Larger Map

Monday, July 23, 2012

Andy Warhol

andy-warhol-michael-jackson-painting
credit:http://www.pynkcelebrity.com/archives/8665 


Big Campbell's Soup Can with Can Opener (Vegetable)
Warhol's 'Eight Elvises', which sold in 2008 for $100m 
http://en.wikicollecting.org/top-ten-most-expensive-andy-warhol-artworks 


Andy Warhol (August 6, 1928 – February 22, 1987) was an American artist who was a leading figure in the visual art movement known as pop art. His works explore the relationship between artistic expression, celebrity culture and advertisement that flourished by the 1960s. After a successful career as a commercial illustrator, Warhol became a renowned and sometimes controversial artist. The Andy Warhol Museum in his native city, Pittsburgh, Pennsylvania, holds an extensive permanent collection of art and archives. Warhol's  artwork ranged in many forms of media that include hand drawing, painting, printmaking, photography, silk screening, sculpture, film, and music

credit:http://en.wikipedia.org/wiki/Andy_Warhol

Sunday, July 22, 2012

Silhouettes, Sand Art

Hi readers! Today's post is going to be a short one. I am going to share with you guys about videos of Silhouettes dance as well as Sand Art. Both are amazingggggggggggggg ;)


 Skip to 1:28 >w< (silhouettes)


Tuesday, July 17, 2012

Wire Tree Sculpture :D

Hello readers! :)
Today I will be showing you the steps of making a Wire Tree Sculpture.
*You might be hurt while making it as the end of the wires are sharp so you have to be careful.

Step 1
Get nine or twelve strands of 24-gauge wire. Decide how high you want your tree to be, and then multiply that by 2.5 (eg, you want a 30cm tree, you need wire thats 75cm long).


Step 2 
Cut your strands equally and bend them in the middle as if you're going to fold them in half (like a U shape). Keeping a loop at the bottom (perhaps make use of your fingers here), twist the two vertical sections together to secure the loop. (this loop will form the roots)


Step 3
Divide the loop into smaller bunches of wire (maybe 2 or 3 strands per new loop). Start twisting these loops individually, and then split them off again and continue twisting until you get a root-like system. You'll be left with mini loops at the end of each root. Using wire-cutters, snip these loops to make the ends of the roots.


Step 4
To create the top half of the tree, gently twist the 18 (in case you use 9 wires) or 24 (12 wires) to make a stem. You do this for a few centimeters, until the height where you want to make the lowest branch. At that place you take four strands and separate those from the rest of the bunch. Those need not be four strands that were already sitting together. You get the best result when you take two strands from each side of the bunch.


Step 5 
Twist these four strands together to make a branch. You make that a few centimeters long.


Step 6
After twisting a branch for a few centimeters, take two strands apart and twist those again. Twist the other two strands together also. Make sure there's a balanced distance between the height of the first branch, the length of the first branch to the first "split" and the rest of the branch.


Step 7
Continue twisting the stem unto the stage where you want to make a second branch.


Step 8
Repeat the process with four strands of wire, etc.


Step 9
Add beads or gem stones if you like.


9 SIMPLE STEPS & YOU ARE DONE! :D.
Enjoy & have fun doing it.
You can share your experience with us & you can post a picture here of your final product! :D.

Credit: http://www.wikihow.com/Make-a-Wire-Tree-Sculpture

Sunday, July 15, 2012

Claying~

Hello everyone! Today we will be teaching you how to mould a coil pot.
Claying can be fun and tests one's patience as claying can take up a lot of time.

Step 1
Squeezing the clay into a coil or rolling between your hands are two ways to make coils. This technique can be difficult to make a smooth round coil because of the uneven pressure from your hands and fingers.


Step 2
When hand rolling coils, use a smooth surface and spread your hands to apply even pressure. Gently roll the clay back and fourth.


Step 3
Roll the coils so that they are a little thicker than a pencil. Then stack the coils one on top of another.


Step 4
For strength, force the clay together on the inside of the piece. Use your finger and scrape the top coil onto the coil under it.


Step 5
When smoothing the inside of the piece hold you other hand on the outside so you do not damage what you have completed already.


Step 6
If you want the top to be level, gently turn your piece over and lightly tap it on a smooth surface.


Step 7 
When you are finished with your piece let it dry slowly. The grooves in the piece are weak spots and if this dries too quick it will crack.


Credit: http://www.jhpottery.com/tutorial/coil.htm

And you are done! All can be done in 7steps.
When you are free, do try claying. (:
You can also showcase your clay works to us if you have any.
Thanks for viewing! Have a great day ahead.

Saturday, July 14, 2012

Origami

Good evening readers! I was just browsing through my Facebook feeds and I came across a post about making an origami of pikachu (you know what that is)


So, for those who are interested in learning how to make this, below here are the following steps. (pardon me if my skills suck) :B and the not-very-clear steps (>_>)