Thursday, July 26, 2012

Masaccio's Paintings

Hey everyone! Let me introduce some of the famous paintings.

Credits: http://hum120.files.wordpress.com/2011/04/2342-004-3c13b075.jpg

Credits: http://www.vanedwards.co.uk/historypics/masaccio.jpg

Credits: http://www.canvaz.com/m/Masaccio/Plate%20of%20Nativity%20(Berlin%20Tondo).jpg

These are some of Masaccio's Paintings. Masaccio, born in 1401, died in 1428. Perhaps one of the most influential artists of the Renaissance. Historians claim that he, along with Donatello and Brunelleschi, inspired the style of art that typifies are of the period. In his 27 years on the planet, he developed a style that used perspective in a way that created an illusion of three-dimensions--a significant change from the flat style of painting that typified medieval art. His most famous work can be found in the Brancacci Chapel in Santa Maria del Carmine in Florence.

Photoshop Tutorial for Beginners and Website Banner Designing!


Hi guys!

For those of you who are interested to do computer graphics and designing through the use of Adobe Photoshop, here's some tutorials to help get you started with it!

These videos will help you understand what each tool does and even teach you how to create your own website banner! This is especially beneficial for people who wants to create their own website in the future!

Have fun!


Random Abstract Drawing

Hello everyone! Today, we will be teaching how to draw a random abstract drawing :D
Create a Random Abstract Drawing Have you ever considered drawing a "Nothingness"? It is really about abstract drawing, drawing with artistic inspiration without specific intentions in mind but moved totally by the creative spirit. Hard to pinpoint exactly what nothingness ought to be, as that really is up to you-the artist-but it is certainly posible to provide some guidance on setting out on this drawing experience.

STEPS:


  1. Start with a blank canvas. 
    Start with a black canvas.
    In this case, a simple piece of blank paper.

  2. Drawing across the canvas with random lines that split up the blank as much as possible.  
    Drawing across the canvas with random lines that spilt up the blank as much as possible. Send these lines all the way across the page. Don't leave anything cut off in the middle of the paper but continue to draw the lines from side to the other, without end.
  3. Fill some of the shapes in that arise in the areas between all of the lines.  
    Fill some of the shapes in that arise in the areas between all of the lines. Just keep using your pencil. There is no pattern to follow; just make it a block of choices in one part of your canvas.
  4. Fill in the majority of the shapes left.  
    Fill in the majority of the shapes left. Use random patterns and similar stuff. Preferably go for big shapes buy you're free to use small ones too. The important essence of nothingness, though, is to follow the random patterns all the time, letting the randomness decide the form for you.
  5. Fill in the rest by just putting a cross in them.  
    Fill in the rest by just putting a cross in them. Go on-try it; it might not seem like a good idea but it will look great,like art :D
Credits : http://www.wikihow.com/Create-a-Random-Abstract-Drawing

Thanks for viewing! Feel free to leave down comments :D

Paintings

Painting

Hi~ Here are some of the pieces i painted during my free time after my O Levels:))
Here's a little note to keep in mind when you paint:
Never use Black to outline or shade! only if it is really dark! Depends on the intensity of light in the picture. Cause Black is a strong color, use Brown instead. mix the original color with Brown to get a darker shade:)

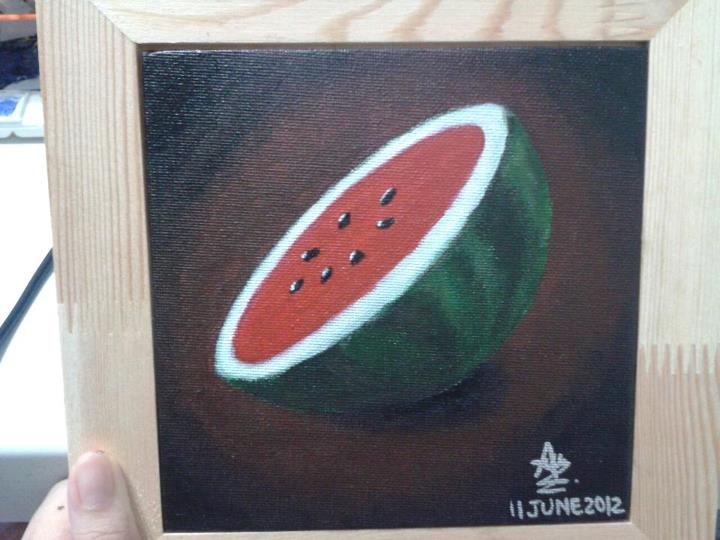
This is my first attempt on watermelons:) it's a little plain haha just trying it out:)
This is my second piece. i decided to give it more "still life' feel with a country theme.
This is my third watermelon. just sitting on a bed of leaves hahha
  And this is the latest watermelon I've painted during the holidays:)
So i decided to try out other themes i could paint on and here's my first attempt on sunset! just trying to play around with the colors, i'm sure there's space for improvements.. it's a combination of all the pictures I've searched online hahaha:) 


I just started painting last year, and my first attempt was my O Level canvas so i learnt a lot from my friends on the spot:) Painting is all about trying out new colors and learning how to mix them well. It is not tough, but i'm still learning:) by the way, if you're searching for a place where you can get your art materials, i've attached an address of Art Friend at buona vista MRT: 100 N Buona Vista Rd, Singapore 139345. It's the easiest to find compared to other branches:)
So, have fun!:)
Follow us on Twitter at:
https://twitter.com/ArtXenses
And like our Facebook page at:
http://www.facebook.com/ArtXenses
THANK YOU!:)


image: http://somethingboutrenes.com/2011/06/23/art-friend-at-buona-vista/
View Larger Map

Monday, July 23, 2012

Bad Boy & Fantastic Baby

Holy moly! I just came across this video shared by my friends on YouTube and words can't describe how awesome it is!

This is a sample video of a daily dance practice from a local school. For this, the people in the video danced to two songs, Bad Boy and Fantastic Baby by the Korean boyband Big Bang.


As this is just a practice session and not an actual performance, the dancers will repeatedly dance to only some parts of the songs. Still, it feels like I'm watching them on stage!


I hope that through sharing this, it will inspire you guys to put on your dancing shoes too!


Andy Warhol

andy-warhol-michael-jackson-painting
credit:http://www.pynkcelebrity.com/archives/8665 


Big Campbell's Soup Can with Can Opener (Vegetable)
Warhol's 'Eight Elvises', which sold in 2008 for $100m 
http://en.wikicollecting.org/top-ten-most-expensive-andy-warhol-artworks 


Andy Warhol (August 6, 1928 – February 22, 1987) was an American artist who was a leading figure in the visual art movement known as pop art. His works explore the relationship between artistic expression, celebrity culture and advertisement that flourished by the 1960s. After a successful career as a commercial illustrator, Warhol became a renowned and sometimes controversial artist. The Andy Warhol Museum in his native city, Pittsburgh, Pennsylvania, holds an extensive permanent collection of art and archives. Warhol's  artwork ranged in many forms of media that include hand drawing, painting, printmaking, photography, silk screening, sculpture, film, and music

credit:http://en.wikipedia.org/wiki/Andy_Warhol

Sunday, July 22, 2012

Silhouettes, Sand Art

Hi readers! Today's post is going to be a short one. I am going to share with you guys about videos of Silhouettes dance as well as Sand Art. Both are amazingggggggggggggg ;)


 Skip to 1:28 >w< (silhouettes)


Tips on doing instrument covers

Hi Viewers!
This post will be Tips On Doing Instrument Covers!


Firstly, find songs that are popular or currently trending as more people will be interested in it.


Secondly, try to find the scores online.
If there is no scores online, you have to guess the notes yourself which needs more effort and time.


Next, play the instrument using cantabile - singing style. 
You have to play according to how the song is originally sung. Even though each phrase may have the same lyrics,  however they might be using different singing tones.


Lastly, have patience and do not give up halfway!
ALL THE BEST FOR YOU! :D


*editing songs may help improving the sound.
**Comments if you have other tips! 

Saturday, July 21, 2012

Jun Sung Ahn (안준성)

Hi guys! How's your weekend? ;)

Today, I am sharing with you guys about songs covers(instrumental).

I happen to come across some covers coming from a teenage violinist,

So, I thought I might want to share with you guys about his amazing skills and who knows, you guys might like him too! n_n

You might want to subscribe his videos if you're interested in his playing/want to know more about him. ;)


Tips on simple Perspectives


Perspective Drawing

Why hello there:) As requested, i did more of perspective sketching today! Perspective is really simple, you just need to get the hang of it:)

Like I've said, Perspective is really important when it comes to sketching buildings, boxes and other standard shapes.
  I'll start my sketch with a box. It's easier to sketch within a box on a piece of paper to allow you to have the space to mark the perspectives.
 Indicate your line of horizon. You can choose, anywhere, according to how deep you want the sketch to look.
 Mark where you want to start the main point
 Draw 2 diagonals. this is the road..?! street..? yea that haha
 Then mark the other 2 markings. Of course you can have those markings outside the paper and imagine the markings and estimate. Just don't estimate too far off the point! you'll know why soon hahhaha
 So i'm starting with the nearest building.. It's like drawing a cuboid. same as the one in the previous post:)
 Perspectives applies to everything! Windows too:) It's very tedious but it makes everything look more proportionate compared to drawing them without using the markings.
 I'll just do one, imagine the rest with windows, i'm sure you can hahahha yea.. and shading. I'm only using 2B so the contrast isn't so obvious but anyway I'm assuming the light comes from the far end of the road/ street hahha
 Perspectives for other shapes.. Or when you're drawing people too!
Mark your furthest point first
 draw your guidelines. Okay i missed out one in this picture which i will add it in later hahahahha
Yep so you divide roughly according to the proportions of the people and follow the guidelines. Remember the shoulders must follow along the lines and not be horizontal!
i should use a better eraser hahaha but it should look something like that!

I'd be posting about painting next! or maybe faces.. Anyway, thank you for your comments and requests on our posts:)
Do give us more advice so we can further improve our blog:) 
Like our Facebook page at:
and Follow us on Twitter at:
Thank you and God bless you!:)

Wednesday, July 18, 2012

Don't you forget...

I have a friend who likes to sing his heart out whenever he's feeling down.

For this, I will share with you all one of his songs. It isn't a completely original song, as the instrumental is the same as "Where'd you go" by Fort Minor.


https://www.facebook.com/photo.php?v=10150209916260331

I do hope that through this share, it will inspire more people to come up with their songs, be it completely original or a cover.


Have a good time!

Tuesday, July 17, 2012

Wire Tree Sculpture :D

Hello readers! :)
Today I will be showing you the steps of making a Wire Tree Sculpture.
*You might be hurt while making it as the end of the wires are sharp so you have to be careful.

Step 1
Get nine or twelve strands of 24-gauge wire. Decide how high you want your tree to be, and then multiply that by 2.5 (eg, you want a 30cm tree, you need wire thats 75cm long).


Step 2 
Cut your strands equally and bend them in the middle as if you're going to fold them in half (like a U shape). Keeping a loop at the bottom (perhaps make use of your fingers here), twist the two vertical sections together to secure the loop. (this loop will form the roots)


Step 3
Divide the loop into smaller bunches of wire (maybe 2 or 3 strands per new loop). Start twisting these loops individually, and then split them off again and continue twisting until you get a root-like system. You'll be left with mini loops at the end of each root. Using wire-cutters, snip these loops to make the ends of the roots.


Step 4
To create the top half of the tree, gently twist the 18 (in case you use 9 wires) or 24 (12 wires) to make a stem. You do this for a few centimeters, until the height where you want to make the lowest branch. At that place you take four strands and separate those from the rest of the bunch. Those need not be four strands that were already sitting together. You get the best result when you take two strands from each side of the bunch.


Step 5 
Twist these four strands together to make a branch. You make that a few centimeters long.


Step 6
After twisting a branch for a few centimeters, take two strands apart and twist those again. Twist the other two strands together also. Make sure there's a balanced distance between the height of the first branch, the length of the first branch to the first "split" and the rest of the branch.


Step 7
Continue twisting the stem unto the stage where you want to make a second branch.


Step 8
Repeat the process with four strands of wire, etc.


Step 9
Add beads or gem stones if you like.


9 SIMPLE STEPS & YOU ARE DONE! :D.
Enjoy & have fun doing it.
You can share your experience with us & you can post a picture here of your final product! :D.

Credit: http://www.wikihow.com/Make-a-Wire-Tree-Sculpture